
The tough bit is over. Your university application is confirmed. Your I-20 is secured. Even the DS-160 form, which is actually worthy of an award, isn’t a problem anymore. But when you visit the visa portal, you see a three-letter acronym – OFC appointment.
And if your immediate reaction is “what is an OFC appointment?” then you’re in good company. OFC is one of those phrases that seems to be scarier than it really is. Students spend sleepless nights googling, watching YouTube clips, and looking through Reddit threads trying to find out what in the world they have to do. But guess what? This is the simplest thing you’ll ever do in your US visa process.
OFC stands for Offsite Facilitation Centre. In simple words, it’s a centre where you go to give your biometrics, which means your fingerprints and a digital photo. No interview. No tricky questions. No one judging your study plans. You walk in, get scanned, and walk out.
This guide explains everything that you should know regarding an OFC appointment, including what is an OFC appointment, who requires it, how to schedule an OFC appointment, what documentation should be carried along, and what exactly transpires on the D-Day.
What Is an OFC Appointment and Who Needs an OFC Appointment?
So the most basic question first: what is an OFC appointment?
An OFC appointment is a visit to an Offsite Facilitation Centre, a dedicated US embassy facility where your biometrics get collected. That means all 10 fingerprints and a digital photograph. That’s literally it. No questions about your university, your job offer, or your travel plans. Nothing like that happens here.
It’s just like when you got your new SIM card and the attendant scanned your fingerprint. Your biometrics are basically your “this is definitely me” proof. The OFC appointment is the embassy’s version of that, except it takes 15 to 30 minutes and involves a lot more paperwork.
So what is the OFC appointment in the bigger picture?
It’s step one of the two in-person steps in the US visa process.
Step one: OFC appointment, where your biometrics are collected. Step two: consular appointment, where you actually meet a visa officer. Both are mandatory, and they usually happen on different days.
Now, who needs an OFC appointment?
Almost everybody applying for a US visa in India. From F-1 students to H-1B professionals, from B1/B2 travellers to J-1 exchange visitors- it doesn’t matter. If you’re applying for a US visa for the very first time, you require an interview. Since October 1, 2025, even those under 14 and over 79 years of age need to personally attend, thus nullifying all the exemptions in the past. The interview exemptions can now be applied only to a few cases, including diplomatic visas, B1/B2 renewals under 12 months, and H-2A renewals.
Why does it matter so much?
Because without this appointment, you can’t move forward to your visa interview. The embassy won’t let you skip biometrics and walk straight into the interview. It’s just as trying to board a flight without checking in first. Not happening. The good news? There are five OFC centres in India: New Delhi (Nehru Place), Mumbai (BKC), Chennai, Kolkata, and Hyderabad (Secunderabad). And you can book any of them, no matter which state you live in.
Can’t find a slot for OFC appointment? Read this Reddit thread and find the answer on how and when to find the perfect desired slot for an OFC appointment.
No OFC appointment in India – r/USVisas
How to Schedule Your OFC Appointment for a USA Visa: 6 Simple Steps
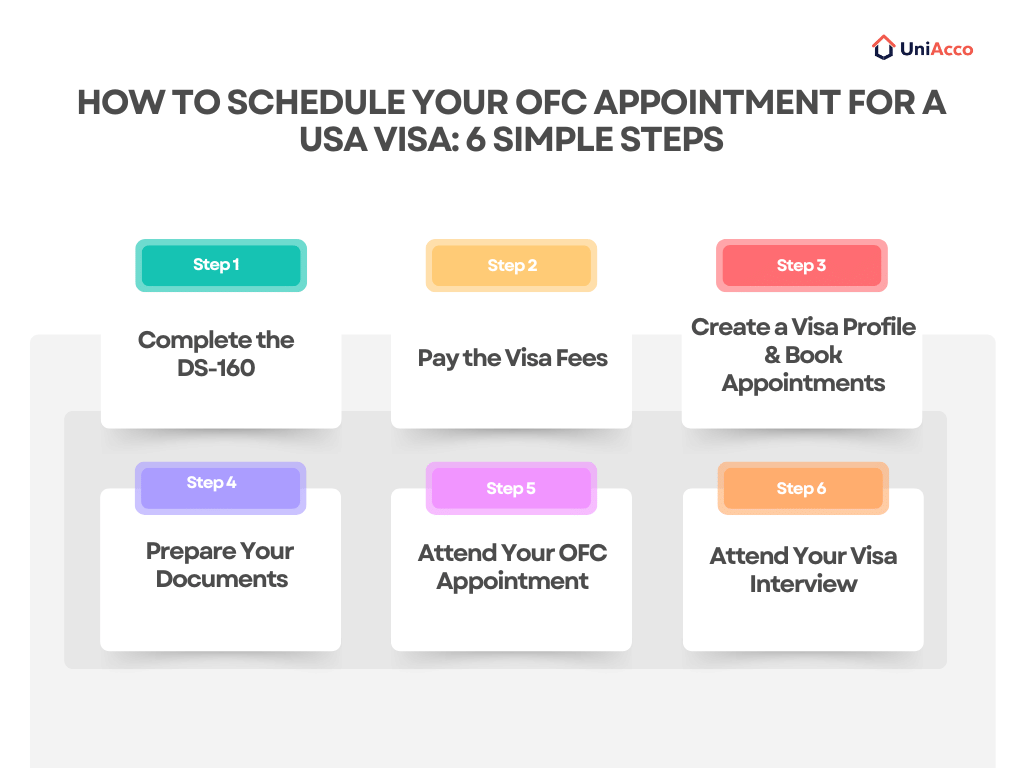
Now that you know what is an OFC appointment, the next thing is to know how to schedule it.
Step 1: Complete the DS-160 Form
First of all, before you start thinking about making any arrangements, you have to complete the DS-160 visa application. You will find it on the official website of CEAC. This document requires you to provide some personal information, travel information, information about your educational background, employment background, and several security questions. Yes, it is very long, but you should take your time and answer honestly and accurately.
Once you finish, you’ll get a DS-160 confirmation page with a barcode. This little page is gold. Save it, print it, screenshot it, and keep it somewhere safe, because you’ll need that barcode to book both of your appointments.
Step 2: Pay the Visa Application Fee
Second on the list is the fee to apply for the visa, also known as the MRV fee. The cost to apply for nonimmigrant visas like the F-1 student visa is $185. This fee can be paid via the scheduling portal. There is no fee for the OFC interview itself. Keep the payment receipt, because you’ll want to show it at the centre.
Important note for F-1 students: In addition to paying the application fee, you have to pay the SEVIS fee, which is $350. This will be paid for the student monitoring system and not the visa. This is very important since your visa interview cannot proceed without it.
Step 3: Create a Visa Profile & Schedule Appointments
Now for the main event. Go to the official website to schedule US visa appointments and make a profile there. Enter your DS-160 number, confirm that you paid the fee, and schedule two appointments – OFC and visa interviews.
This may be surprising for most students, but OFC appointment slots are generally available much sooner than the interview appointment slots. So, if you think that the interview appointment is too far away, don’t worry because it’s perfectly normal. As of January 2025, you’re allowed just one free reschedule via the portal; a second reschedule (or a missed appointment) means booking a new appointment and paying the $185 fee again, so treat your first booked date as close to final as you can. So set those phone reminders the moment you book.
Step 4: Prepare Required Documents
It is better to organise your documents when waiting for your appointment date. That way, you won’t have to fumble through your bag for documents right there at the reception desk. See the full list below, but here are the bare necessities that need to be taken along: passport, DS-160 application confirmation, OFC appointment confirmation, receipt for the visa fee, and your visa interview appointment confirmation.
Step 5: Attend Your OFC Appointment
On the day, show up at your chosen centre at least 15 to 30 minutes early. You’ll pass through security, get your documents verified, have your photo taken, and give your fingerprints. That’s the whole experience. You’ll be out in 15 to 30 minutes, wondering what all the fuss was about.
Step 6: Attend Your Visa Interview
Finally, you attend your visa interview at the US embassy or consulate on your scheduled date. This is where they ask about your study plans, your finances, your ties back home, all of that. The OFC appointment doesn’t test you on any of it. It just verifies your identity so this conversation can even happen.
Documents Required for OFC Appointment
You recognise that feeling when you’re heading to the airport, and you keep patting your pocket to make sure your passport is still there? Channel that energy for your OFC appointment. Here’s the complete checklist, item by item.
Valid Passport
Your passport needs to be valid for at least six months beyond your intended stay in the US. This is not negotiable, so check the expiry date way before your appointment day.
DS-160 Confirmation Page
The barcode page you got after submitting your form. Print a fresh copy if you can. Blurry phone screenshots don’t always scan well, and you don’t want a scanner-related heart attack at the counter.
OFC Appointment Confirmation
The confirmation you received when you booked your slot on the portal. It has your date, time, and centre details, and the staff will ask for it.
Visa Fee Receipt (if applicable)
If you paid the MRV fee, carry the receipt. The system usually tracks your payment automatically, but having the receipt on hand means zero eleventh-hour panic if something doesn’t match.
Visa Interview Appointment Confirmation
Yes, you need this too, even though your interview is on a different day. It proves you’ve booked both steps, which is exactly what the OFC staff want to see.
Optional but Recommended:
For F-1 Students
Your I-20 form and documents provided by the university for the admission process. Although these are not mandatory at the OFC centre, it is best to keep them all in one folder so that you won’t miss them in the interview.
Still feel like missing an important document? Read this Quora discussion and find out if your checklist meets the requirements.

What Happens During the OFC Appointment?
Here’s the thing: the OFC appointment is honestly the most chill part of the whole US visa process. You don’t answer questions. You don’t defend your study plans. You just show up, get processed, and leave. Here’s the exact flow, step by step.
1. Security Screening
Just like at the airport, there will be a security screening first before anything else. Your phones, wallet, and other items have to be put in a tray while your bags get screened. Put all of your papers in an open folder; that way, it is easier to take them out.
Tip: Do not bring electronic devices like smartwatches and power banks if possible.
2. Document Verification
The staff will review your passport and verify the appointments in their system. This is where the confirmation of your DS-160 and OFC appointment will be used. Once they match, you can proceed to the next station. It is that simple.
3. Digital Photograph
You’ll have a fresh digital photo taken on the spot. It’s a plain, passport-style photo, so no reason to worry about looking camera-ready. Just skip the hat, skip the headphones, and keep your face fully visible. Yes, you can smile.
4. Fingerprint Scanning
At last, you need all 10 of your fingerprints scanned. It’s really easy and takes just about a minute or two. Think of it like the fingerprint setup on a new phone, except the embassy keeps it on file to verify your identity at your visa interview.
And that’s it. Fifteen to thirty minutes after you walk in, you’re walking out. The centre holds on to your passport to process your visa, and if your interview goes well, you’ll collect it back from the same centre once your visa is approved.
Key Things to Know About the OFC Appointment
A few things are worth understanding before you book, so you walk in with the right expectations and zero surprises.
It Is Not a Visa Interview
Repeat after me: the OFC appointment is not the interview. No visa officer will ask why you chose a particular university or how you plan to fund your stay. It’s purely biometrics. The actual conversation happens at the consular appointment, which is completely separate. If you want one line on the difference between an OFC appointment and a consular appointment, here it is: one collects your fingerprints, the other collects your answers.
Biometrics Must Be Completed First
Your fingerprints have to be on file before you can sit for your visa interview. The embassy won’t let you skip this step, which is why you need to book both appointments with the OFC one first. Even if they land on different days or different weeks, the order doesn’t change. The visa biometric appointment always comes before the interview.
Accuracy of DS-160 Matters
Remember that long form you filled out? The OFC centre uses it to verify your identity. Your biometrics will not match if there is the slightest mistake in your name, date of birth, or passport number, and you may have to redo the entire process. You need to be just as careful while filling this document as you were while applying to a college.
Common Mistakes to Avoid During Your OFC Appointment
Nobody likes wasting their time, right? So let’s look at some common errors that people make, and see how to avoid them like the pros.
Incomplete DS-160 Form
This is one of the most frequent errors. An empty space somewhere, an incorrect date somewhere else, and voila – your visa appointment is postponed. It’s easy to fix before you send in the form; just read each question twice.
Incorrect Visa Photo
Although the centre will take a picture of you on-site, you will still be required to upload your own digital photo for the DS-160. If your uploaded photo does not comply with the U.S. visa photo specifications due to improper dimensions or lighting, among others, it might be rejected by the form.
Missing Your OFC Appointment
Alright, this is something that happens A LOT! Either people get the dates mixed up, mistake the OFC appointment for the interview, or, the worst-case scenario: show up at the wrong centre. India has 5 different OFC centres, so please double-check the address. Set a reminder for both appointments because a missed appointment would put all that effort down the drain. And we are sorry to tell you this, but you’d have to reschedule.
Tips to Prepare for an OFC Appointment
A little preparation goes a long way. Here are three simple tips to make your OFC appointment as smooth as possible.
Arrive on Time
Seems obvious, but many people realise this later. Aim to reach the centre 15 to 30 minutes before your slot. Late arrivals often can’t be accommodated and may need to reschedule, which involves waiting at least 24 hours. Treat it like a flight: if you’re not early, you’re late.
Organise Your Documents
Keep all of your documents in one folder: passport, DS-160, OFC appointment, proof of payment of fees, and interview confirmation form. The moment they ask you for any one document, you should have it within a second; don’t look for it in your bag like a treasure hunt.
Dress Appropriately
You are not going for a job interview, and you don’t need a suit, promise. Smart casual is just perfect: a clean T-shirt or shirt, jeans or trousers, comfortable shoes. Just look neat and presentable, like you would for a passport office visit. And skip caps, sunglasses, or anything that covers your face, because they need a clear photo and clean fingerprints.
Conclusion
So, what is an OFC appointment? It is a short biometric test that takes place after you fill out your DS-160 form and before the visa interview. Nothing to worry about. Not an interview at all. And doesn’t usually take more than 30 minutes. You arrive, give your fingerprints, have your picture taken, and go home.
The US visa process can look confusing at first. But when you break it down, it is actually quite simple: fill out the form, pay the fee, book your OFC appointment, and attend the interview. That’s it.
Book your OFC appointment early, keep your documents ready, arrive on time, and you’ll be one step closer to starting your studies in the US.

 LinkedIn









0 Comments