
Studying abroad is a defining step for many students, promising academic growth, international exposure, and career opportunities. However, this journey also brings a less glamorous but unavoidable reality of documentation. Every stage, from applications, offers, finances, to visas, relies on accurate, verified paperwork.
A record 1.8 million Indian students are studying overseas today. If you’re preparing to follow the same path, clarity on the documents required for study abroad is non-negotiable. Many applications slow down simply because the documents required for study abroad are incomplete or incorrectly prepared.
This blog outlines a comprehensive list of documents required for abroad study, helping you prepare with confidence and avoid the setbacks that many students experience.
Documents Required To Study Abroad: At A Glance
| Document | Purpose | Required For | When to Prepare |
| Academic Documents | Provide proof of your educational history, qualifications, and academic readiness. | University applications, programme eligibility checks, scholarships. | 9–12 months before intake |
| Identification Documents | Verify your identity, nationality, and personal details. | Test registrations, university applications, visa processes. | Immediately |
| Financial Documents | Demonstrate your ability to fund tuition, living expenses, and travel abroad. | University financial checks, visa approval, education loan applications. | 3–6 months before visa |
| Test Scores | Show your language proficiency and academic aptitude through standardised exams. | Admissions evaluation, eligibility verification, scholarship assessment. | 6–8 months before intake |
| Health Documents | Confirm your medical fitness and compliance with destination health requirements. | Visa approvals, university onboarding, insurance activation. | 1–2 months before travel |
| Visa Documents | Provide official proof of admission and eligibility to enter and study in the country. | Visa applications, immigration checks, border entry. | Post-admission confirmation |
Importance of Documents Required for Abroad Study
When it comes to studying abroad, your paperwork is the foundation of your entire journey. These must-have documents required for abroad study determine whether your dream takes off smoothly or gets stuck midway.
- Proof of Academic Eligibility: Universities evaluate your application through your transcripts, certificates, and test scores. These documents needed to study abroad confirm that you meet their entry requirements.
- Validation of Your Credentials: Verified records such as passports, academic certificates, and recommendation letters establish your identity and authenticity. They help universities trust that your application is legitimate.
- Confirmation of Financial Capacity: Visa officers and universities need assurance that you can manage tuition and living expenses. Bank statements, loan approvals, and scholarship letters clearly meet this requirement.
- Avoidance of Administrative Delays: Incorrect or missing paperwork can stall admissions or trigger visa refusals. Having complete, accurate documents keeps your application moving without unnecessary setbacks.
- Smooth Arrival and Setup: Essential documents make your transition abroad easier, from university registration to housing, banking, and part-time work. Being organised saves time and stress after you arrive.
- Peace of Mind Throughout the Journey: When your documents are properly prepared, you eliminate uncertainty. It gives you the space to focus on academics, adjustment, and new experiences instead of paperwork issues.
Also read: The Ultimate Study Abroad Checklist Every Student Needs
From university halls to private studios, find a space that suits your lifestyle and budget. Focus on studying and living fully — UniAcco has got your back.
🏠 Browse Verified Aberdeen Accommodations10 Most Important Documents Required for Abroad Study
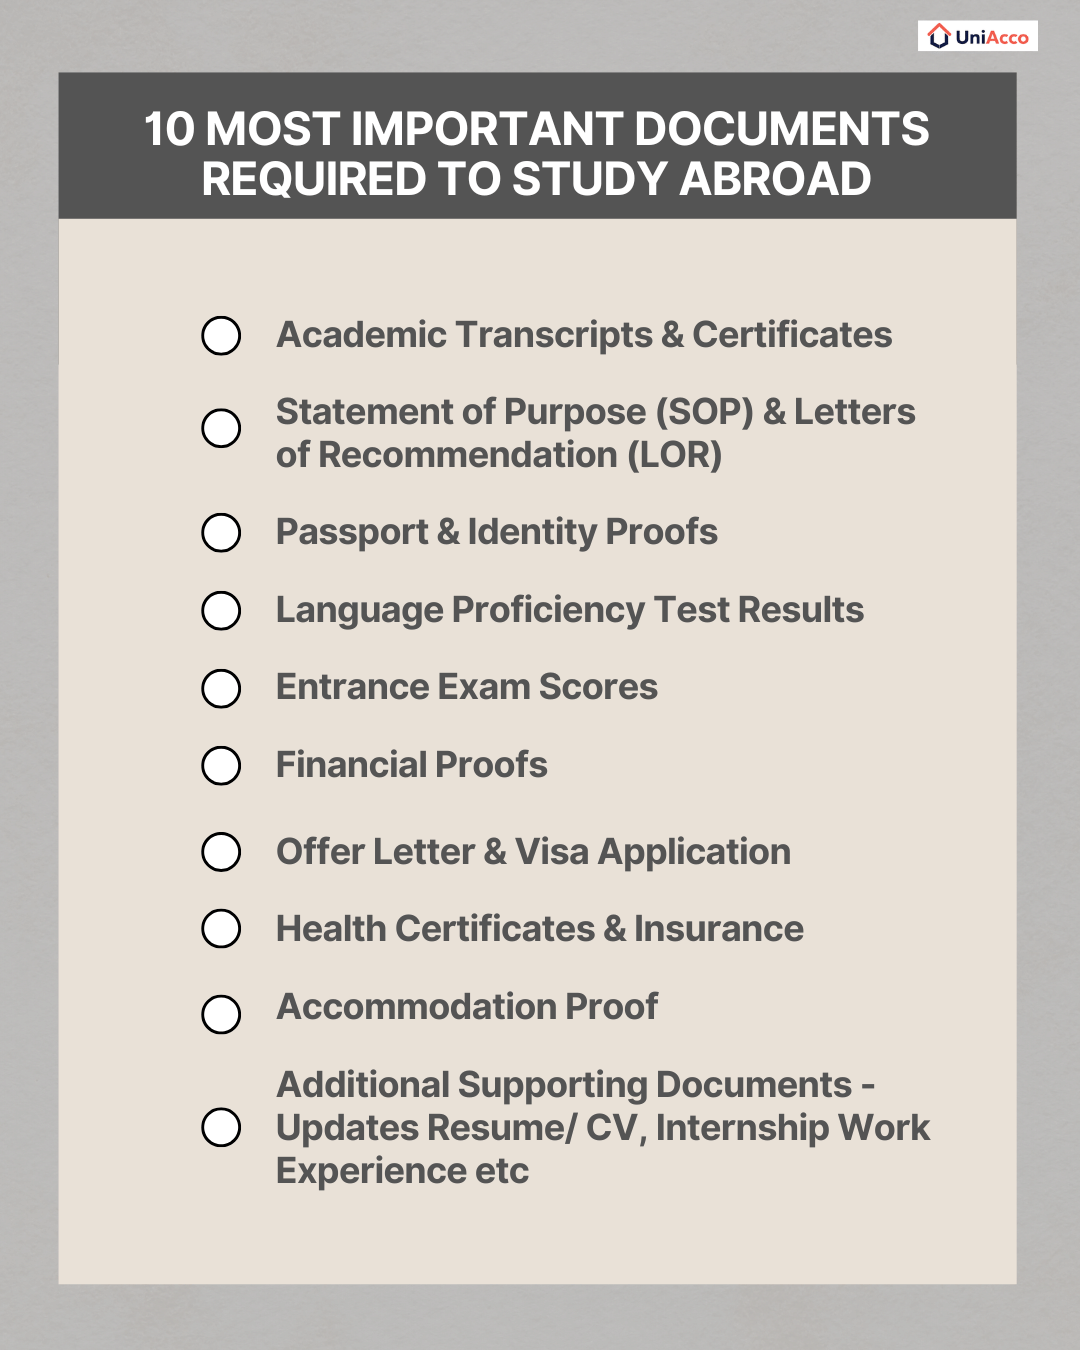
Preparing for your study-abroad journey often feels exciting but demanding, especially when you start gathering documents. Knowing what are the documents required for study abroad, why each one matters, and how to prepare them correctly can save you time, stress, and unexpected delays.
Academic Transcripts & Certificates
Academic transcripts are the official record of a student’s academic performance across a school, college, or university. They include the subjects studied, the grades earned, the credits completed, and the qualification awarded.
For international admissions, these transcripts act as a verified summary of your academic background, helping universities understand the rigour of your previous education. In most countries, transcripts must be issued directly by your institution’s examination office, sealed, stamped, and sometimes translated if not originally in English.
How It Supports Your Application?
- To verify your academic background: Universities evaluate transcripts to confirm that your previous education meets their entry standards. These records show the depth of learning, subjects completed, and overall performance across years.
- To assess programme-specific eligibility: Your transcript helps admissions teams check prerequisites, such as maths for engineering or research credits for master’s programmes. It ensures you’re prepared for the academic workload of the course you’re applying to.
- To authenticate qualifications during visa processing: Many countries require transcripts as part of visa documentation to confirm your education is legitimate and earned from a recognised institution.
- To compare grading systems internationally: Since grading varies across countries, transcripts help universities align your performance with their own evaluation frameworks or convert grades into their system.
Who Must Submit?
Almost every study-abroad applicant needs academic transcripts, but the exact requirements differ based on the level of study and destination country. Here’s a clear breakdown.
| Applicant Type | Documents Required | Notes |
| UG Applicants | Class 10 & 12 transcripts, school leaving certificate | Must be translated if not in English Required in the UK, Canada, Germany, Australia, USA. |
| PG Applicants | Semester-wise undergraduate transcripts, consolidated transcript (if available), degree certificate/provisional degree | USA often prefers consolidated transcripts; Australia requires credit-point clarity. |
| Research Applicants | Undergraduate + postgraduate transcripts, degree certificates, academic record of research work | Europe typically requires MEA attestation or apostille for authenticity. |
| Country Specific | Canada, Germany: Certified translations. USA: direct digital transcript submissions preferred by many universities. | Requirements differ by university; always cross-check with institution guidelines. |
What Universities and Visa Officers Expect?
Most universities require transcripts to be issued directly by your institution, sealed in an official envelope, and stamped or signed by the registrar. If your documents are not in English, they must be translated by an authorised translator and accompanied by an accuracy certificate.
Countries such as Germany and the Netherlands may also require MEA attestation or an apostille for legal validity. For hard copies, the seal must remain intact; for soft copies, universities typically expect high-resolution PDFs or secure digital submissions sent through approved platforms.
Ideal Preparation Timeline
| Timeline | What You Should Do |
| 12 Months Before Intake | Request fresh academic transcripts from school/college/university. Begin translation or attestation if needed. |
| 6–9 Months Before Intake | Keep sealed hard copies ready. Upload digital copies for application portals. |
| 3–6 Months Before Intake | Complete MEA attestation, apostille, or embassy legalisation if required by your destination country. |
| 1–3 Months Before Intake | Make sure degree certificates or provisional degrees are issued before visa appointments. |
| Final Month | Keep spare photocopies and labelled digital backups. |
Common Errors To Avoid
Students often lose time or face application issues because of incomplete, unclear, or improperly formatted transcripts.
| Common Mistakes | Quick Tips |
| Submitting transcripts with broken or tampered seals. | Always collect transcripts in sealed envelopes and store them carefully. |
| Uploading low-quality scans that make grades hard to read. | Create high-resolution PDF scans (300 dpi or above). |
| Not translating transcripts issued in regional languages. | Use authorised translators for accurate, globally accepted translations. |
| Missing semester-wise mark sheets when universities require them. | Confirm each university’s format preference before uploading documents. |
| Using uncertified photocopies instead of attested copies. | Ensure every copy is attested by your institution’s registrar/administration office. |
| Ignoring grading scale differences. | Request your institution’s official grading scale or evaluation sheet and include it in your submission. |
| Waiting too long to request transcripts, especially during peak seasons. | Request transcripts early—registrar offices often take weeks to process documents. |
Statement of Purpose (SOP) & Letters of Recommendation (LOR)
The Statement of Purpose (SOP) is a student’s personal narrative that explains their academic interests, career goals, motivations, and reasons for choosing a specific course and university. It offers admissions teams an insight into who you are beyond grades.
Letters of Recommendation (LORs) complement your SOP by providing an external evaluation of your abilities, written by professors, mentors, or employers who can articulate your strengths, skills, and potential.
How It Supports Your Application?
- To assess your motivation and clarity of purpose: The SOP reveals your thought process, long-term aspirations, academic intent, and your understanding of the programme. It shows whether you’re genuinely prepared for the course.
- To demonstrate your fit for the university: A well-written SOP explains why you chose the specific institution, how its curriculum aligns with your goals, and what value you bring to the cohort.
- To validate your abilities through credible voices: LORs authenticate your achievements, work ethic, skills, and academic performance through firsthand observations from people who’ve taught or supervised you.
- To strengthen your application beyond grades: When multiple applicants hold similar academic scores, the SOP and LORs become key differentiators, shaping how admissions committees perceive your potential.
Who Must Submit?
Almost all international universities require an SOP and LORs, but the number and type vary across programmes and study levels. Here’s a clear breakdown.
| Applicant Type | Documents Required | Notes |
| UG Applicants | 1 SOP 1–2 academic LORs | Required by the UK, USA, Canada, Australia. Some UG programmes may accept counsellor recommendations. |
| PG Applicants | 1–2 SOPs (course-specific) 2–3 academic or professional LORs | USA often requires 3 LORs UK typically requires 2. MBA programmes prefer employer LORs. |
| Research Applicants | Detailed research-focused SOP 2–3 academic LORs from professors or supervisors | Critical for PhD applications; emphasises research experience and academic readiness. |
| CountrySpecific | USA: strong preference for detailed, quantifiable LORs. UK: concise, academic-focused LORs. Germany: strict format and endorsements. | Always check programme-specific instructions. |
What Universities and Visa Officers Expect?
Most institutions require the SOP to be original, plagiarism-free, and within a set word limit (usually 500–1,000 words). LORs must be written on official letterhead, signed by the recommender, and include their designation, email, and contact details. Some universities require LORs to be submitted directly by recommenders through secure portals, while others accept institution-stamped PDFs.
For both documents, clarity, structure, and authenticity are essential, with some countries applying strict formatting and verification checks.
Also Read: A 5 Star Rated SOP Sample For Australia For An Easy Entry To Your Uni
Ideal Preparation Timeline
| Timeline | What You Should Do |
| 12 Months Before Intake | Begin shortlisting recommenders and brainstorming SOP themes. |
| 6–9 Months Before Intake | Draft the SOP and request recommenders to begin writing your LORs. |
| 3–6 Months Before Intake | Finalise the SOP and collect signed, attested, or portal-submitted LORs. |
| 1–3 Months Before Intake | Review documents for consistency with the rest of your application. |
| Final Month | Keep digital and printed copies ready for visa and university onboarding. |
Common Errors To Avoid
Students often struggle with SOPs and LORs because they rush the process or follow generic templates.
| Common Mistakes | Quick Tips |
| Writing generic SOPs filled with clichés and vague goals. | Be specific. Explain your journey, motivations, and course alignment clearly. |
| Choosing recommenders who barely know your work. | Select professors or employers who’ve evaluated you closely. |
| Missing word limits or submitting poorly structured SOPs. | Follow the university’s format; maintain clarity and flow. |
| Allowing grammar issues or factual inconsistencies across documents. | Proofread thoroughly and ensure details match your resume and transcripts. |
| Requesting LORs last minute, resulting in rushed or weak letters. | Ask well in advance and provide recommenders with your achievements. |
| Submitting plagiarised or AI-generated SOPs. | Keep the writing authentic—universities run advanced plagiarism checks. |
| Uploading LORs without signatures, contact details, or official letterhead. | Verify that each LOR includes all mandatory identification details. |
Passport & Identity Proofs
Your passport is your primary global identity document and the most critical requirement for international travel and admission. It verifies your nationality, identity, and eligibility to enter another country. Along with the passport, government-issued IDs such as Aadhaar, PAN card, and driver’s licence serve as supplementary verification for university forms, financial documents, loan processing, and visa applications.
These documents confirm who you are at every stage of the study-abroad process, making them some of the most essential documents required for abroad study.
How It Supports Your Application?
- To confirm your identity for every stage of the application process: A valid passport is required to register for entrance exams, submit university applications, book visa appointments, and complete immigration procedures.
- To meet visa and travel compliance regulations: Immigration authorities require your passport to remain valid for a minimum duration, usually six months beyond your course end date, to ensure you can legally enter and stay in the destination country.
- To authenticate your personal information across all official documents: Universities, banks, and visa officers use your passport and identity proofs to cross-check your name, date of birth, address, and citizenship for accuracy and fraud prevention.
- To complete financial and accommodation formalities: Additional identity proofs are often required for education loan processing, accommodation bookings, and local registrations after arrival.
Who Must Submit?
| Applicant Type | Documents Required | Notes |
| UG Applicants | Valid passport, Aadhaar/PAN/School ID | Passport must have sufficient validity; ID proofs required for exams and university applications. |
| PG Applicants | Valid passport, Aadhaar/PAN, previous institution ID | Necessary for entrance tests, visas, and loan documentation. |
| Research Applicants | Valid passport, Aadhaar/PAN, institution-issued ID cards | Often required for grant applications and supervisor/department verification. |
| Country Specific | USA/UK/Australia: passport with 6+ months validity beyond stay. Schengen countries: Biometric passport recommended. | Some countries mandate in-person verification of identity documents. |
What Universities and Visa Officers Expect?
Passports must be machine-readable, biometric (if applicable), and valid for at least six months beyond your expected course completion date. Identity proofs like Aadhaar, PAN, or driver’s licence must be government-issued, up-to-date, and clearly readable.
Most universities accept scanned PDFs for applications, while visa authorities often require original documents during appointments. Ensure that names, dates of birth, and addresses are consistent across all documents to avoid processing delays.
Ideal Preparation Timeline
| Timeline | What You Should Do |
| 12 Months Before Intake | Apply for a new passport or renew an expiring one. Update Aadhaar/PAN details if needed. |
| 6–9 Months Before Intake | Keep several photocopies and digital scans ready for applications and exams. |
| 3–6 Months Before Intake | Check passport validity and renew if it expires during your study period. |
| 1–3 Months Before Intake | Prepare original documents for visa biometrics and embassy interviews. |
| Final Month | Store digital backups securely; keep hard copies in travel folders. |
Common Errors To Avoid
Many students overlook basic passport and ID requirements, leading to avoidable delays during the application or visa stages.
| Common Mistakes | Quick Tips |
| Applying for a passport too late, especially during peak seasons. | Begin the process early—passport services often experience delays. |
| Not checking passport expiry dates before university and visa submissions. | Ensure validity extends at least six months beyond course end. |
| Submitting ID proofs with mismatched personal details. | Cross-check your name, DOB, and address across all documents. |
| Carrying only a single copy of essential identity documents. | Keep multiple photocopies and encrypted digital backups. |
| Losing documents due to poor storage or careless travel handling. | Use a waterproof folder; store digital copies in secure cloud storage. |
| Using damaged or illegible identity proofs. | Replace worn-out cards early to avoid rejection at verification points. |
Discover safe and convenient accommodation options for students in Edinburgh. Focus on studies and enjoy your city life hassle-free.
🏠 Browse Verified Edinburgh AccommodationsLanguage Proficiency Test Results
Language proficiency test results, such as IELTS, TOEFL, PTE Academic, and the Duolingo English Test, serve as official proof of your ability to speak, understand, read, and write in English. Since English is the primary medium of instruction in most international universities, these scores help institutions assess whether you can manage academic lectures, assignments, discussions, and collaborative work.
Each test evaluates your skills through structured modules, and the scores are used globally to measure your readiness for university-level communication.
How It Supports Your Application?
- To confirm your ability to handle academic communication: Universities require proof that you can understand lectures, participate in seminars, produce academic writing, and communicate effectively throughout your course.
- To meet institutional and immigration language standards: Admissions committees and visa officers rely on test scores to ensure applicants meet the minimum language requirements set by the country and university.
- To increase your eligibility for competitive programmes: Higher scores strengthen your profile, especially for courses with limited seats or strict academic expectations.
- To access scholarships and funding opportunities: Many universities and government-funded scholarships consider strong language scores as part of merit-based selection.
Who Must Submit?
| Applicant Type | Documents Required | Notes |
| UG Applicants | IELTS/TOEFL/PTE/DET scores | Required for the UK, USA, Canada, Australia, Ireland. DET accepted widely for UG courses. |
| PG Applicants | IELTS/TOEFL/PTE scores | Business, STEM, and healthcare programmes often have higher score thresholds. |
| Research Applicants | IELTS/TOEFL scores only (rarely DET) | Strict cut-offs for PhD and research-intensive programmes. |
| Country Specific | UK: SELT-approved tests may be required. USA: TOEFL preferred by top universities. Australia: PTE widely accepted. | Score validity typically 2 years. Always confirm university preferences. |
What Universities and Visa Officers Expect?
Most universities accept IELTS, TOEFL, and PTE Academic as standard proofs of English proficiency, while many also accept Duolingo for faster online evaluation. Scores must be sent directly to universities through official test portals to ensure authenticity. Results are typically valid for two years, and institutions expect clear, legible digital score reports or secure electronic submissions.
Some countries (e.g., the UK) require SELT-approved versions of the test for visa applications, so applicants must confirm format requirements in advance.
Ideal Preparation Timeline
| Timeline | What You Should Do |
| 12 Months Before Intake | Decide which test aligns with your target universities and begin light preparation. |
| 6–9 Months Before Intake | Register for the test and begin intensive preparation. |
| 3–6 Months Before Intake | Take the test and send official scores to universities. |
| 1–3 Months Before Intake | Retake the test if you need to improve your score. |
| Final Month | Keep digital copies and confirmation emails ready for visa appointments. |
Common Errors To Avoid
| Common Mistakes | Quick Tips |
| Choosing a test not accepted by your target universities. | Check each university’s accepted tests before registering. |
| Underestimating preparation time and scoring below the cut-off. | Follow a structured study plan and use official mock tests. |
| Missing score submission deadlines. | Send scores immediately through the test provider’s portal. |
| Relying only on coaching material without practising real test patterns. | Use official guides and simulate actual exam conditions. |
| Ignoring score validity (usually 2 years). | Ensure your score remains valid through your visa period. |
| Not preparing for the speaking section, assuming it’s intuitive. | Practise with a partner or through recorded mock sessions. |
| Booking test dates too close to university deadlines. | Schedule the test early enough to allow for a retake if required. |
Entrance Exam Scores
Entrance exam scores refer to standardised test results required by many international universities to assess your analytical, mathematical, verbal, and problem-solving abilities. These exams, like the GRE and GMAT for postgraduate programmes, or the SAT and ACT for undergraduate admissions, provide universities with a standard academic benchmark for evaluating students applying from diverse educational systems.
Some specialised courses may also require subject-specific tests, making these scores an important part of your overall academic profile.
How It Supports Your Application?
- To provide a common evaluation benchmark for global applicants: Standardised tests allow universities to compare students from different curricula, boards, and education systems using a consistent, measurable scale.
- To assess readiness for academically demanding programmes: These exams evaluate critical reasoning, quantitative skills, and verbal proficiency, which are key indicators of your ability to manage international coursework.
- To distinguish strong applicants in competitive programmes: High scores give you a competitive edge, especially in courses with limited seats or high application volumes.
- To qualify for scholarships, assistantships, or merit-based funding: Many institutions offer financial support based partly on strong GRE, GMAT, SAT, or ACT performance.
Who Must Submit?
| Applicant Type | Documents Required | Notes |
| UG Applicants | SAT/ACT scores | Required by many universities in the USA Optional but beneficial for competitive programmes. |
| PG Applicants (Non-Management) | GRE scores | Required or recommended for STEM and analytics programmes in the USA and some EU universities. |
| PG Applicants (Management/MBA) | GMAT or GRE | GMAT strongly preferred for top MBA programmes. |
| Country Specific | USA: SAT/ACT for UG, GRE/GMAT for PG. Canada: some PG programmes require GRE. Europe: selective universities require GRE for STEM. | Always check updated programme-specific requirements. |
What Universities and Visa Officers Expect?
Most universities require official scores sent directly from the testing agency, like ETS for GRE, GMAC for GMAT, College Board for SAT, or ACT Inc. for ACT. Score reports must be current, with validity usually ranging between two and five years, depending on the test.
Digital score submissions through secure portals are preferred, while PDFs or screenshots uploaded by students are typically not accepted for verification. Universities may also specify section-wise minimum scores in addition to overall cut-offs.
Also Read: ACT vs SAT: What are the Key Differences?
Ideal Preparation Timeline
| Timeline | What You Should Do |
| 12 Months Before Intake | Identify required tests for your target programmes and begin foundational preparation. |
| 6–9 Months Before Intake | Register for your exam and begin intensive study using official guides. |
| 3–6 Months Before Intake | Take the test and send official scores to universities. |
| 1–3 Months Before Intake | Retake the exam if you need a higher score. |
| Final Month | Keep score confirmations and submission receipts ready for visa and university processes. |
Common Errors To Avoid
| Common Mistakes | Quick Tips |
| Choosing an exam that your target universities do not accept. | Check university websites before registering for any test. |
| Beginning preparation too late and scoring below target ranges. | Follow a structured study plan with regular mock tests. |
| Relying solely on free materials that don’t match exam difficulty. | Use official guides from ETS, GMAC, College Board, or ACT. |
| Missing score submission deadlines. | Send scores immediately after receiving results via official portals. |
| Not planning for a retake. | Schedule your exam early enough to allow one or two retakes. |
| Ignoring section-wise minimum score requirements. | Review programme-specific cut-offs for quant, verbal, and analytical sections. |
| Uploading unofficial score PDFs in place of direct submissions. | Always send scores through the testing agency’s secure system. |
Financial Proofs
Financial proofs include documents such as recent bank statements, fixed deposit certificates, loan sanction letters, sponsor affidavits, and scholarship award letters. These documents demonstrate that you have adequate funds to cover tuition fees, student accommodation, travel, and daily living expenses for the full duration of your programme.
Universities and visa authorities use these proofs to verify your financial readiness, ensuring you can sustain yourself without financial difficulty while studying abroad.
How It Supports Your Application?
- To verify your ability to fund tuition and living expenses abroad: Visa authorities and universities need assurance that you can manage the financial responsibilities associated with international study.
- To comply with minimum fund requirements set by each country: Countries like the UK, USA, Canada, and Australia have strict financial thresholds, often requiring proof of funds equivalent to one full year of tuition and living expenses.
- To establish credibility and reduce visa rejection risk: Strong, verifiable financial documents demonstrate financial stability, reducing the likelihood of your visa being denied due to insufficient funds.
- To validate the source of funds for compliance and security checks: Financial proofs help immigration officers track legitimate sources of money and prevent fraudulent submissions.
Who Must Submit?
| Applicant Type | Documents Required | Notes |
| UG Applicants | Bank statements, affidavit of support, scholarship letters (if applicable) | Parents/guardians often serve as primary sponsors. |
| PG Applicants | Bank statements, education loan sanction letters, sponsor affidavits | Many PG students combine personal savings with education loans. |
| Research Applicants | Scholarship/fellowship letters, bank proofs (if required) | Funded programmes may exempt candidates from extensive financial proofs. |
| Country Specific | UK: 28-day bank balance rule. USA: I-20 requires full proof of one-year funds. Canada: GIC + bank proofs Australia: evidence of annual income or savings. | Requirements change often; always check updated government guidelines. |
What Universities and Visa Officers Expect?
Financial documents must be recent, stamped by the issuing bank or institution, and presented in clear, verifiable formats. Bank statements typically must cover the last six months, showing consistent balance levels. Affidavits of support must be notarised and include details of the sponsor’s relationship to the student.
Loan sanction letters should come directly from authorised banks or NBFCs with clear breakdowns of sanctioned amounts. Scholarship letters must be official, on letterhead, and clearly state the awarded amount, duration, and coverage. Visa authorities accept only original or officially attested copies, not self-issued printouts.
Ideal Preparation Timeline
| Timeline | What You Should Do |
| 12 Months Before Intake | Begin maintaining a stable account balance; explore loan or scholarship options. |
| 6–9 Months Before Intake | Request updated bank statements and secure loan sanction letters if needed. |
| 3–6 Months Before Intake | Prepare notarised affidavits, update bank proofs, and collect scholarship confirmation letters. |
| 1–3 Months Before Intake | Ensure documents meet Country Specific fund requirements and validity periods. |
| Final Month | Keep updated proofs for the final visa interview and border entry checks. |
Common Errors To Avoid
| Common Mistakes | Quick Tips |
| Maintaining fluctuating or insufficient bank balance. | Keep a stable balance for at least six months before applying. |
| Submitting unverified or unstamped financial documents. | Ensure every document is stamped and signed by the issuing authority. |
| Relying solely on large last-minute deposits. | Avoid sudden high-value deposits as they raise red flags during verification. |
| Missing sponsor details in affidavits. | Include sponsor’s income proof, relationship, and commitment to support. |
| Using outdated scholarship or loan letters. | Always submit the latest versions with exact amounts covered. |
| Not meeting Country Specific fund rules (28-day rule, GIC, income thresholds). | Read the visa guidelines carefully for each country. |
| Forgetting to send official financial proofs to universities. | Upload documents in the correct portal format and verify receipt when required. |
Offer Letter & Visa Application
An offer letter is the official confirmation issued by your chosen university stating that you have been admitted to a specific course. It outlines your program details, duration, start date, fees, and next steps for enrollment.
The visa application, on the other hand, includes government-issued forms, biometrics, photographs, financial proofs, and supporting documents required to study abroad legally. These documents allow you to enter the destination country, remain there for the duration of your programme, and access essential services as an international student.
How It Supports Your Application?
- To confirm your admission and eligibility for a student visa: A university cannot issue visa-related documents without an accepted offer letter. It serves as proof that you have secured a seat in a recognised programme.
- To meet legal entry requirements of the destination country: Visa applications ensure you meet immigration rules, including identity verification, financial capability, and academic intent. Without a valid visa, you cannot travel or enrol.
- To grant you permission to reside and study during your course: Student visas legally allow you to stay in the country for the programme duration, work part-time (where permitted), and access university services.
- To complete essential pre-arrival and onboarding formalities: Your offer letter and visa documents may be required when booking accommodation, registering with local authorities, or purchasing health insurance abroad.
Who Must Submit?
| Applicant Type | Documents Required | Notes |
| UG Applicants | Offer letter, visa application form, passport, photographs, financial proofs | Required for all countries including the UK, USA, Canada, Australia, Ireland. |
| PG Applicants | Offer letter, CAS/I-20/CoE, visa forms, biometrics | PG programmes may require additional forms such as research or GTE assessments. |
| Research Applicants | Offer/admission letter, supervisor confirmation, specialised visa forms | Many countries require additional documentation for research clearance. |
| Country Specific | USA: I-20, SEVIS fee, DS-160. UK: CAS + student visa application. Canada: LOA + SDS forms and biometrics. Australia: CoE + GTE requirements. | Always follow the latest checklist from the embassy or consulate. |
Also Read: Understanding University Offers- All You Need To Know
What Universities and Visa Officers Expect?
Offer letters must be issued on official university letterhead, clearly stating the course details, duration, tuition fees, and acceptance conditions. Visa application documents must follow the exact format prescribed by the embassy: a valid passport, compliant photographs, online visa forms, financial proofs, biometric data, and country-specific documents like I-20, CAS, LOA, or CoE.
All submissions must be accurate, complete, and uploaded or submitted through official portals such as gov.uk, USCIS, IRCC, or the Australian immigration portal. Only original documents, embassy-certified copies, or digitally verified submissions are accepted.
Ideal Preparation Timeline
| Timeline | What You Should Do |
| 12 Months Before Intake | Start shortlisting universities and understand visa requirements for each country. |
| 6–9 Months Before Intake | Accept offers promptly and pay initial deposits. Request CAS/I-20/LOA as required. |
| 3–6 Months Before Intake | Begin the visa application process, book biometrics, prepare financial proofs, and complete mandatory forms. |
| 1–3 Months Before Intake | Complete your visa interview and track application status. Submit any additional documents requested by the embassy. |
| Final Month | Keep printed and digital copies of your visa, offer letter, and travel documents ready. |
Common Errors To Avoid
| Common Mistakes | Quick Tips |
| Delaying the acceptance of your offer letter or paying deposits late. | Accept offers promptly and track payment confirmations. |
| Entering incorrect details in visa forms (name, passport number, dates). | Cross-check every detail with your passport and offer letter. |
| Missing mandatory documents such as I-20, CAS, LOA, or CoE. | Request required documents early from your university. |
| Booking visa appointments too late during peak season. | Book biometric and interview slots as soon as applications open. |
| Submitting incomplete financial proofs. | Follow country-specific financial requirements strictly. |
| Uploading low-quality scans or incorrect file formats. | Use high-resolution PDFs and follow embassy upload guidelines. |
| Not preparing for visa interviews adequately (USA/Canada). | Practise key interview questions and keep documents well organised. |
Health Certificates & Insurance
Health-related documents include your medical fitness reports, vaccination records, and proof of international health insurance. These documents ensure that you meet the public-health requirements of your destination country and are medically fit to begin your programme.
Many universities and immigration departments accept only authorised medical reports from approved clinics or panel physicians. Health insurance is compulsory in most study-abroad destinations and provides financial protection against medical emergencies, hospital visits, and unexpected health issues during your stay.
How It Supports Your Application?
- To verify you are medically fit for international travel and study: Authorities require medical fitness certificates to ensure you do not carry infectious diseases and can adapt to academic and environmental conditions abroad.
- To meet public-health and immunisation standards: Mandatory vaccinations protect both incoming students and local communities. Countries enforce strict immunisation rules to prevent outbreaks and maintain health safety.
- To ensure financial protection in case of medical emergencies: Health insurance is a legal requirement in countries like the UK, Canada, the USA, Australia, and many EU nations. It prevents high out-of-pocket medical expenses during your stay.
- To complete university registration and on-campus access: Many universities will not allow you to enrol or access residence halls without valid health documentation and insurance coverage.
Who Must Submit?
| Applicant Type | Documents Required | Notes |
| UG Applicants | Medical fitness certificate, vaccination records, health insurance | Mandatory in the UK, USA, Canada, Australia, New Zealand. |
| PG Applicants | Medical certificate, destination-specific vaccinations, health insurance | Some programmes (e.g., public health, nursing) require additional tests. |
| Research Applicants | Comprehensive medical reports, immunisation proofs, full-coverage insurance | Lab-based or clinical research may require stricter medical clearance. |
| Country Specific | Australia: Panel physician medical exam. USA: TB, MMR, Varicella records. UK: Health surcharge + vaccination proof. Canada: Panel physician medical exam. | Requirements are updated frequently. Check official embassy guidelines. |
What Universities and Visa Officers Expect?
Medical certificates must be issued by recognised doctors or government-approved panel physicians and should clearly state your fitness to travel and study. Vaccination records must include batch numbers, dates, and the name of the administering medical authority.
Health insurance documents must outline coverage details, validity dates, and emergency benefits, and should be purchased from approved providers where required (e.g., OSHC for Australia). All documents should be submitted in English or accompanied by authorised translations.
Ideal Preparation Timeline
| Timeline | What You Should Do |
| 12 Months Before Intake | Check destination-specific medical and vaccination requirements. |
| 6–9 Months Before Intake | Complete medical check-up and begin mandatory vaccinations. |
| 3–6 Months Before Intake | Purchase international health insurance aligned with visa rules. |
| 1–3 Months Before Intake | Collect updated fitness certificates and final vaccination proofs. |
| Final Month | Keep printed and digital copies ready for travel and arrival checks. |
Common Errors To Avoid
| Common Mistakes | Quick Tips |
| Getting medical tests from non-approved or unverified clinics. | Visit panel physicians or authorised medical centres only. |
| Missing mandatory vaccinations required by the destination country. | Check official health guidelines early for the US/UK/Australia/Canada. |
| Purchasing insurance that doesn’t meet visa or university coverage requirements. | Choose plans that include emergency care, hospitalisation, and repatriation. |
| Not keeping updated medical records or vaccination booklets. | Maintain digital and printed copies for immigration and campus checks. |
| Submitting incomplete medical reports without test results. | Ensure your fitness certificate includes full test details and a doctor’s signature. |
| Waiting until the last minute to purchase OSHC/health insurance. | Buy insurance early, as it is required for visa processing in many countries. |
Accommodation Proof
Proof of accommodation is an official document confirming where you will live while studying abroad, whether it is university housing, privately rented student accommodation, a host family, or a temporary stay approved by your institution.
Universities and visa authorities require this information to verify that you have secure, safe, and legitimate housing arrangements upon arrival. These documents also help institutions and immigration officers maintain accurate records for communication, emergency support, and compliance purposes.
How It Supports Your Application?
- To verify that you have a confirmed place to stay upon arrival: Immigration officers need assurance that international students are not entering the country without safe or verified housing arrangements.
- To complete visa and pre-arrival compliance: Many countries require you to submit accommodation details when applying for a visa, especially for SDS, CAS, CoE, or I-20 issuance.
- To ensure student safety and reliable communication: Universities use your accommodation details to support you during onboarding, emergencies, or important notifications.
- To strengthen the credibility of your study-abroad application: Having confirmed student accommodation shows that you are prepared, organised, and equipped for international relocation, reducing the risk of visa delays.
Who Must Submit?
| Applicant Type | Documents Required | Notes |
| UG Applicants | University housing confirmation, hostel allocation, or private rental agreement | UG students often use university dorms; confirmation letters are widely accepted. |
| PG Applicants | Private rental agreements, university hall bookings, temporary accommodation proofs | PG students frequently stay off-campus; detailed lease agreement may be required. |
| Research Applicants | On-campus residence confirmations, departmental accommodation approvals | Some universities allocate research housing tied to departments or grants. |
| Country Specific | UK: Accommodation details required during CAS issuance. Canada: Proof for SDS is optional but recommended. Australia: Often required with CoE. Germany: Mandatory for visa application. | Always follow embassy-specific formats. |
What Universities and Visa Officers Expect?
Accommodation proof must be issued by a verified housing provider, such as a university, licensed landlord, approved student housing platform, or registered accommodation agency. Documents should include your full name, complete address, duration of stay, room type, and official confirmation or signature.
Many universities accept digital contracts, booking confirmations, and email verification, while some embassies require signed tenancy agreements or stamped letters. All details must match the information on your visa application and passport.
Ideal Preparation Timeline
| Timeline | What You Should Do |
| 12 Months Before Intake | Explore student accommodation types and shortlist safe, verified options. |
| 6–9 Months Before Intake | Apply for university housing or start booking private accommodation. |
| 3–6 Months Before Intake | Finalise your contract, collect booking confirmations, and organise payment receipts. |
| 1–3 Months Before Intake | Double-check address accuracy and emergency contact details before submitting them for your visa. |
| Final Month | Keep printed and digital copies of all accommodation documents. |
Common Errors To Avoid
| Common Mistakes | Quick Tips |
| Booking accommodation through unverified landlords or unsecured websites. | Use a trusted student housing platform, like UniAcco or university-managed accommodation. |
| Submitting documents with mismatched personal details. | Ensure your name and passport details match your contract. |
| Delaying accommodation booking until after visa approval. | Secure housing early as visa applications often require your housing details. |
| Accepting verbal agreements without written proof. | Always collect official confirmation emails, receipts, and signed contracts. |
| Not checking the accommodation’s distance from the university. | Verify commute time and access to public transport. |
| Uploading low-quality or incomplete housing documents. | Use high-resolution PDFs with full address, dates, and provider details. |
Additional Supporting Documents
Additional supporting documents include materials that strengthen your profile beyond academics, such as your updated CV, internship certificates, co-curricular achievements, research work, and volunteer records. These documents help universities understand your skills, interests, work ethic, and relevant experience in the real world.
For certain programmes, especially those that are creative or research-oriented, documents such as portfolios or published articles play a crucial role in demonstrating capability and potential.
How It Supports Your Application?
- To provide a holistic view of your capabilities and personality: Universities want students who bring more than just strong grades. Supporting documents show your involvement, interests, and strengths across academic and non-academic areas.
- To highlight relevant professional or practical experience: Internship and work certificates show your exposure to real-world applications and help admissions teams assess your readiness for advanced coursework.
- To assist in programme-specific evaluation: Creative programmes, research degrees, and competitive courses often require portfolios, publications, or project summaries for a deeper assessment.
- To increase your chances in competitive applicant pools: When many candidates have similar academic scores, supporting documents can help distinguish your profile and make your application memorable.
Who Must Submit?
| Applicant Type | Documents Required | Notes |
| UG Applicants | Resume, co-curricular certificates, volunteer records | Helpful for holistic admissions, especially in the USA and certain UK universities. |
| PG Applicants | Resume/CV, work experience certificates, internship letters, publications | Often required for business, STEM, research, and professional degrees. |
| Research Applicants | Research papers, conference presentations, published articles, project summaries | Critical for PhD and research-intensive programmes; strengthens supervisor approvals. |
| Creative Course Applicants | Portfolio, project work, creative samples | Mandatory for design, architecture, fine arts, media, film, and related fields. |
What Universities and Visa Officers Expect?
Supporting documents must be clearly formatted, up-to-date, and professionally organised. Resumes should follow standard academic or professional templates, while certificates must include official stamps, dates, and the details of the verifier.
Portfolios must be submitted in the format required by the university, which includes PDF, website link, or digital folder. Publications should include DOI links, journal names, or scanned copies. All documents should be in English or accompanied by authorised translations to ensure universal review and acceptance.
Ideal Preparation Timeline
| Timeline | What You Should Do |
| 12 Months Before Intake | Begin updating your resume and organising certificates from school, internships, or part-time roles. |
| 6–9 Months Before Intake | Collect verified certificates, request letters from mentors or employers, and prepare your portfolio (if applicable). |
| 3–6 Months Before Intake | Finalise your CV, proofread documents, and organise them in labelled digital folders. |
| 1–3 Months Before Intake | Upload documents to application portals and prepare additional versions for visa or scholarship applications. |
| Final Month | Keep both printed and digital copies easily accessible for university onboarding. |
Common Errors To Avoid
| Common Mistakes | Quick Tips |
| Submitting outdated or poorly formatted resumes. | Use a clean academic or professional template and update regularly. |
| Uploading unverified or incomplete certificates. | Ensure all certificates include dates, signatures, and organisation details. |
| Including irrelevant or excessive documents. | Add only materials that strengthen your application and match the programme. |
| Creating rushed or unstructured portfolios. | Curate only your best work; follow the university’s required format. |
| Losing track of certificates or project files. | Store everything in well-labelled folders with cloud backups. |
| Forgetting translation requirements. | Translate non-English documents professionally and attach certification. |
Read insights from students who successfully organised their study abroad documents.
Tips to Stay Organised While Preparing Documents
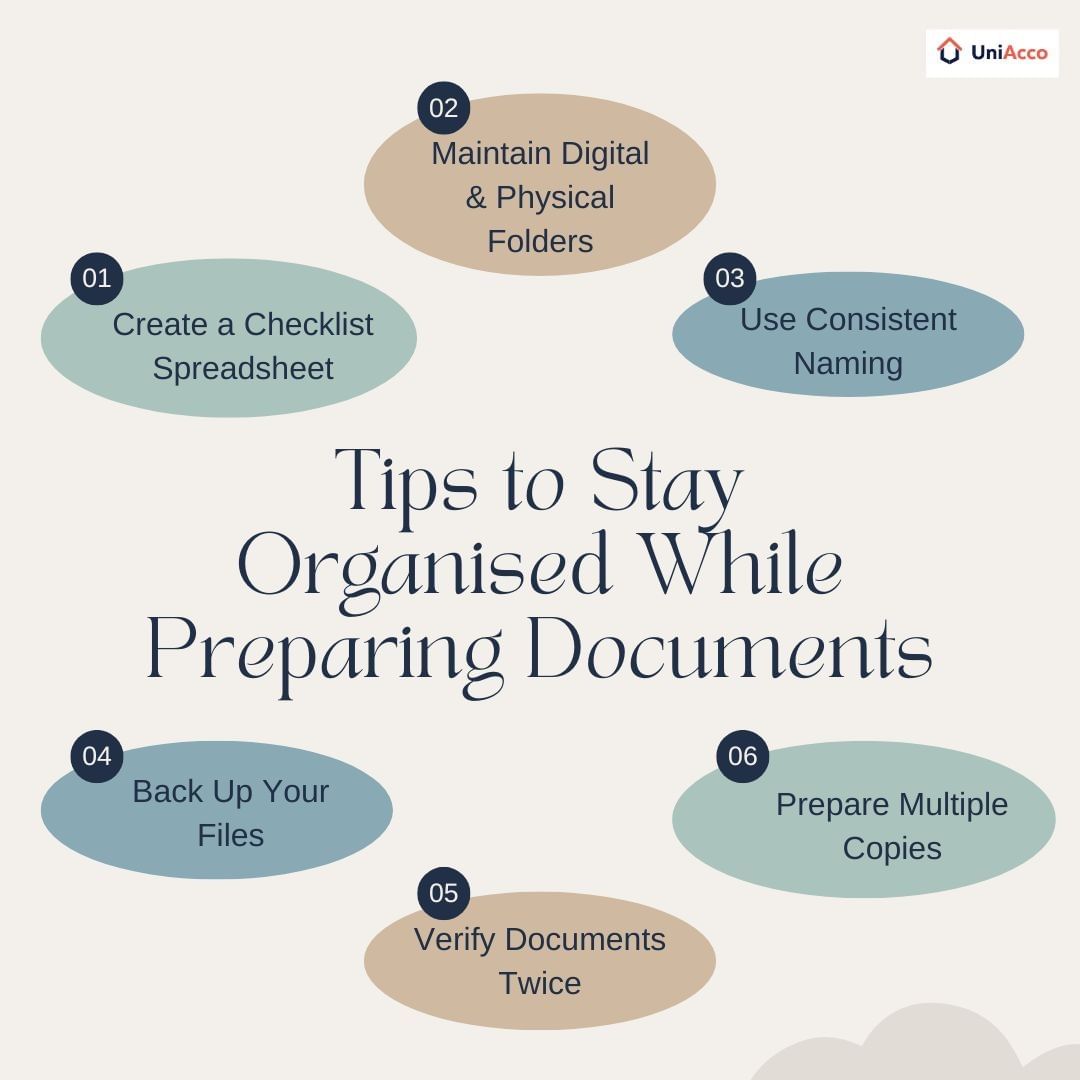
Preparing all the documents required for abroad study can feel overwhelming, but staying organised makes the process smooth and stress-free. Here are some actionable tips:
Create a Checklist Spreadsheet:
Make a complete list of all your documents along with their respective deadlines for each stage, including applications, exams, visa processing, and travel preparations. By checking off each item as you complete it, you stay motivated and ensure that no important document or task is overlooked.
Maintain Digital & Physical Folders:
It’s important to keep separate folders for digital scans and physical copies of your documents. This ensures that you can access them anytime and prevents last-minute panic in case a paper is misplaced or needed urgently for submission.
Use Consistent Naming:
Always name your files clearly and consistently, using a format like “Noor_Passport.pdf” or “Noor_SOP.docx,” as this simple practice can save you hours of confusion and hassle when submitting multiple documents online.
Back Up Your Files:
Make sure to store all your digital documents on reliable cloud storage services and also email copies to yourself. Losing an important file can create unnecessary stress, so keeping multiple backups ensures that you always have access to your documents whenever needed.
Verify Documents Twice:
Before submitting your documents to universities or embassies, make sure to carefully cross-check each one for accuracy, ensure all required signatures are present, and verify that any translations are correct and properly certified, as even a small oversight can cause delays or result in your application being rejected.
Prepare Multiple Copies:
You should always keep extra printed copies of your documents for embassy visits or any on-the-spot requests, as being well-prepared demonstrates responsibility and helps keep your mind calm during potentially stressful procedures.
Discover safe and convenient accommodation options for students in Edinburgh. Focus on studies and enjoy your city life hassle-free.
🏠 Browse Verified Edinburgh AccommodationsConclusion
A well-organised important documents list is the foundation of a confident and hassle-free study abroad experience. When you understand the documents required for abroad study early on, you give yourself the space to gather accurate paperwork, meet university and visa timelines, and avoid last-minute complications that can delay your plans. Review the requirements for your destination carefully, keep all documents updated and accessible, and treat this preparation as the first milestone in your international education journey. With the right documents in place, the rest of the process becomes far easier to manage.
As you finalise your paperwork, remember to sort your living arrangements early too. UniAcco offers a straightforward way to compare and secure student accommodation, helping you settle in smoothly when you arrive.


 LinkedIn


0 Comments